The First Step
Introduction
One of the most common difficulties in using Hermes for new developers/users is managing a partnership and programming the web service requester before they are able to deliver messages to their partner. This article is purposed to assist the user to create and maintain partnerships in Hermes. For more information on the installation and administration console of Hermes, please refer to Installing Hermes.
What is a partnership?
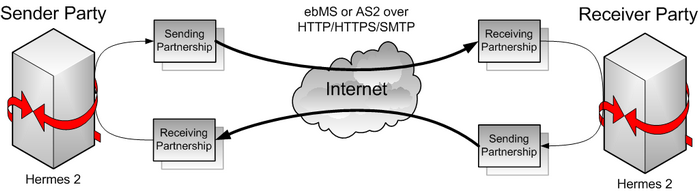
A partnership in Hermes is defined as a channel to your business partner. A partnership is a simplex (one-way) communication channel to your business partner. In a typical two-way business document exchange, the Hermes in each party should have TWO partnerships; one for sending, another for receiving. After the partnerships have been defined, the application can reference the partnerships to send or receive business messages.
Existing partnership types
Currently, Hermes has two types of partnerships, which are ebMS and AS2. They represent the communication agreement with your partner to use ebMS protocol and AS2 protocol respectively.
ebMS 2.0 partnership
What is an ebMS 2.0 partnership?
For an ebms 2.0 partnership, CPA (Collaboration Protocol Agreement) ID, Service and Action are used to uniquely identify each partnership. The values of these parameters will appear in the headers of outgoing ebMS messages. The purpose of these parameters for a sending partnership and a receiving partnership are different:
- In a sending partnership, these values are taken as the values in the ebMS headers of outgoing messages.
- In a receiving partnership, these values are taken as filtering criteria. If Hermes receives an ebMS message whose CPA ID, Service and Action values do not have a matching partnership, a negative acknowledgement will be sent back to the sender and no application can retrieve the message on the receiving side.
In Hermes, the Service parameter for sending and receiving partnerships has to be HTTP URL (Universal Resource Locator). The Service has a different meaning in each partnership:
- For a sending artnership, the Service acts as the endpoint URL of the sending Hermes for receiving acknowledgement.
- For a receiving partnership, since the Service is a filtering criterion for incoming messages, it should be the endpoint URL of the sending Hermes.
Let us look at a typical example below, in which two Hermes communicate using ebMS protocol:
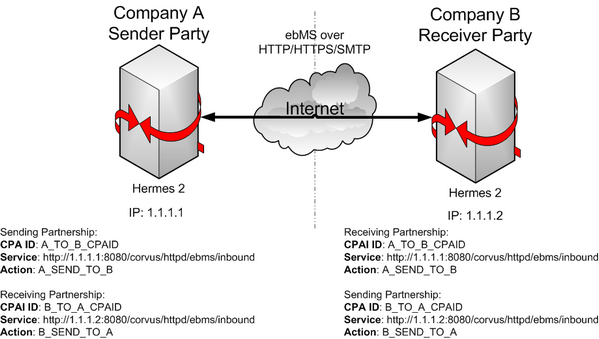
In the above scenario, the Hermes in company A has an IP 1.1.1.1. Its Service value for receiving incoming acknowledgements is http://1.1.1.1:8080/corvus/httpd/ebms/inbound, where we suppose the application server is running on port 8080. Similarly, the Service value for company B is http://1.1.1.2:8080/corvus/httpd/ebms/inbound.
Since the receiving partnership’s CPA ID, Service and Action filter the incoming messages, the values in the receiving partnership of the receiving Hermes should always be the same as the values in the sending partnership of the sending Hermes.
How to create your first ebMS 2.0 partnership
Open a Web browser.
Go to Hermes Administration Console at
http://<LOCALHOST>:<PORT>/corvus/admin/home.Enter the administrator username and password for Hermes.
Click Ebms Plugin in the module tab located on the left hand side.
Click the Partnership tab on the central horizontal tabbed bar to display the partnership creation page.
To create the simplest ebMS 2.0 partnership, you are only required to fill in the following seven fields in the form:
- Partnership ID
- CPA ID
- Service
- Action
- Transport URL
- Retries
- Retry Interval
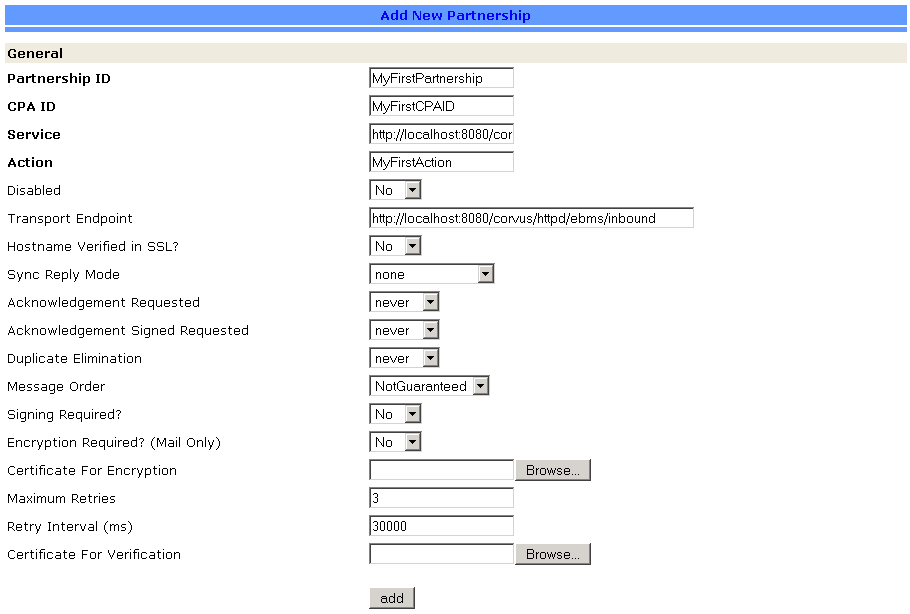
Fill in Partnership ID, CPA ID, Service and Action as shown below: Partnership ID is the unique identifier of the partnership in the sending Hermes while the three remaining fields (CPA ID, Service and Action) form a composite identifier between sending and receiving systems.
Partnership ID MyFirstPartnershipCPA ID MyFirstCPAIDService http://localhost:8080/corvus/httpd/ebms/inbound Action MyFirstActionFill in the Transport Endpoint (the receiver’s URL) as shown below:
The Transport Endpoint URL should be formatted as
http://<RECEIVER_HOST>:<PORT>/corvus/httpd/ebms/inboundwhere
corvus/httpd/ebms/inboundis the context path for accepting and receiving incoming ebXML messages if the receiving system is also using Hermes.Since the receiving host below is the same as the sending host (i.e. the ebMS message loops back to the sender), only ONE partnership is required for sending and receiving.
Transport Endpoint http://localhost:8080/corvus/httpd/ebms/inbound Fill in the number of retries allowed if the message fails to be delivered and the retry interval as shown below:
Retries 3Retry Interval (ms) 30000Now you have completed all required fields and you should have the same input as the figure shown here.
Click the add button at the bottom of the page.
A dialog box will prompt you to confirm adding the partnership. Click Ok.
The message Partnership Added Successfully will be shown on the status bar (the bottom of the page).
Congratulations! You have successfully created your first ebMS 2.0 partnership.
How to update an ebMS 2.0 partnership
Do steps 1-5 in How to create your first ebMS 2.0 partnership or all steps if you have not registered a partnership in Hermes.
You should able to see a drop-down list under the header Registered Partnership.
Click the Change button.
Now you should able to see a module called Selected Partnership that contains the information of selected partnership from the previous step like here.
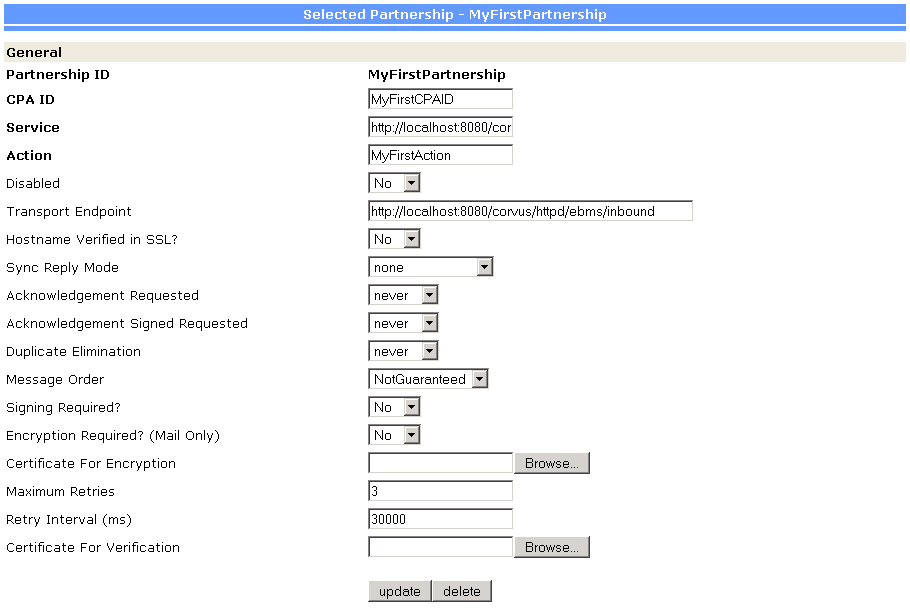
Change the desired parameters/fields and click Update when you are done.
A dialog box will prompt you to confirm the updates. Click Ok.
The message Partnership Updated Successfully will be shown on the status bar (the bottom of the page).
How to delete an ebMS 2.0 partnership
- Do the steps 1-4 in How to update an ebMS 2.0 partnership.
- Click the Delete button
- The message Partnership deleted successfully will be shown on the status bar (the bottom of the page).
AS2 partnership
What is an AS2 partnership?
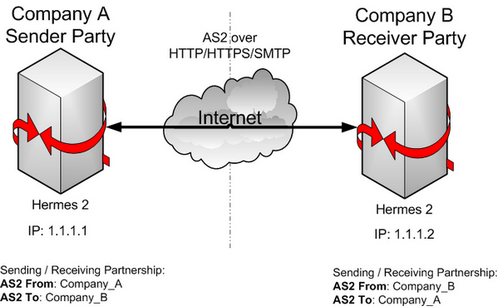
For an AS2 partnership, the AS2 From and AS2 To fields in a partnership are used to uniquely identify it. The values of these parameters will appear in AS2 message headers. The purpose of these parameters for a sending partnership and a receiving partnership are different:
In a sending partnership, these values are taken as the values in the headers of outgoing messages.
In a receiving partnership, these values are taken as filtering criteria. If Hermes receives an AS2 message whose AS2 From and AS2 To values do not have a matching partnership, the incoming message is rejected/ignored and no application can retrieve the message on the receiving side.
Note
The values of AS2 From and AS2 To in the incoming AS2 message are interchanged before finding the matching partnership (i.e. the filtering criteria [AS2 From, AS2 To] = [Incoming AS2 To, Incoming AS2 From] in the AS2 message).
Although the values of AS2 From and AS2 To have no constraints, it is highly recommended that they be company specific, such as Data Universal Numbering System (DUNS) numbers, or simply identification strings agreed upon between trading partners.
Let us look at a typical example below, in which two Hermes communicate using AS2 protocol:
How to create your first AS2 partnership
Open a Web browser.
Go to Hermes Administration Console at
http://<LOCALHOST>:<PORT>/corvus/admin/home.Enter the administrator user name and password for Hermes.
Click the AS2 Plugin in the module tab located on the left hand side.
Click the Partnership tab on the central horizontal tabbed bar to display the partnership creation page.
To create the simplest AS2 partnership, you are only required to fill in the following seven fields in the form:
- Partnership ID
- AS2 From
- AS2 To
- Subject
- Transport URL
- Retries
- Retry Interval
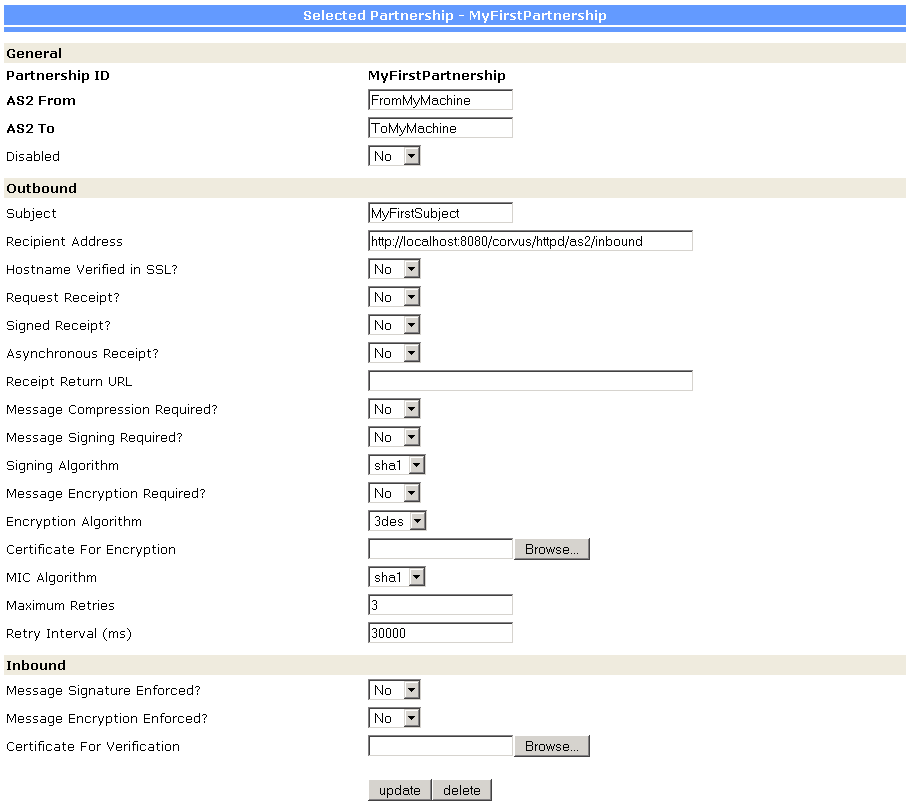
Fill in Partnership ID, AS2 From and AS2 To as shown below: Partnership ID is the unique identifier of the partnership in the sender Hermes while the two remaining fields (AS2_From, AS2_To) form a composite identifier between sending and receiving systems.
Partnership ID MyFirstPartnershipAS2 From FromMyMachineAS2 To ToMyMachineFill in the Subject and Transport Endpoint (the receiver’s URL) as shown below:
The Transport Endpoint URL should be formatted as
http://<RECEIVER_HOST>:<PORT>/corvus/httpd/as2/inboundwhere
corvus/httpd/as2/inboundis the context path for accepting and receiving incoming AS2 messages if the receiving system is also using Hermes.Since the receiving host below is the same as the sending host (i.e. the AS2 message loops back to the sender), only ONE partnership is required for sending and receiving.
Subject MyFirstSubject Transport Endpoint http://localhost:8080/corvus/httpd/as2/inbound Fill in the number of retries allowed if the message fails to be delivered and the retry interval as shown below:
Retries 3 Retry Interval (ms) 30000 Now you have completed to all required fields and you should have the same input as the figure shown here.
Click the add button at the bottom of the page.
A dialog box will prompt you to confirm adding the partnership. Click Ok.
The message Partnership Added Successfully will be shown on the status bar (the bottom of the page).
Congratulations! You have successfully created your first AS2 partnership.
How to update an AS2 partnership
Do the steps 1-5 in How to create your first AS2 partnership or all steps if you have not registered a partnership in Hermes.
You should able to see a drop-down list under the header Registered Partnership.
Click the Change button.
Now you should able to see a module called Selected Partnership that contains the information of selected partnership from previous step like here.
Change the desired parameters/fields and click Update when you are done.
A dialog box will prompt you to confirm the update. Click Ok.
The message Partnership Updated Successfully will be shown on the status bar (the bottom of the page).
How to delete AS2 partnership
- Do the steps 1-4 in How to update an AS2 partnership.
- Click the Delete button.
- The message Partnership deleted successfully will be shown on the status bar (the bottom of the page).
Conclusion
The main benefit of partnerships is that it provides abstraction on technical parameters. The abstraction is beneficial because:
- The application does not need to change if your business partner changes the parameters, since all technical parameters are contained within the partnership.
- The application only needs to submit payloads. It does not contain any code that is specific to the communication protocol between messaging gateways.
- The application does not need to handle the raw and cryptic ebMS / AS2 messages. Therefore, developers only need to focus on business logic and integration with the backend systems.